page
Android Development MOC
Introduction to Android Development
Android is an open-source operating system that is widely used; it can be installed on almost any device, by becoming an Android developer, you can target many devices and form factors, like mobile, smart watches, TVs, desktops, tablets and even VR/AR devices!
Why learn Android Development?
The Android OS is the most used OS in the world with 70% of the mobile Operating systems in the market. By becoming an Android developer you will be able to bring your apps to the most used Operating System in the world.
Reasons
- Open Source: the Android OS is fully open-source, meaning that you can develop for a platform that you can fully understand.
- Lower barrier to entry: While not as accessible as Web Development, Android Development is accessible to anyone interested in the topic, you only need a computer with Any of the major OS (Windows, Linux, Mac)
- Cross-platform opportunities: Skills in Android development translate well into other Mobile and Backend platforms.
- Best practices and Resources: The Android community is known for having good Architecture practices that in another platform they aren’t really taking into account, this might add complexity at the beginning, but as time goes this can help you build better software in any other platform.
What challenges does Android Developer deals with?
Although this might feel like a overwhelming amount of reasons to not be an Android developer, it is true that nothing is perfect and it is better to take this as a guide to be aware what topics are complex and where you will need to put more effort to be a good Android developer.
Reasons
- Fragmentation: Android is the most used OS, which means that it runs on **many **devices, which causes difficulty in making sure that your app works across all devices and form factors.
- Permission Management: Properly handling permissions across multiple versions of Android can be a complex task as permission changes across multiple versions of Android.
- Customisation: Android has the particular characteristic of being able to customise quite a lot of the OS, which is a good thing for users, but as developer that means that you need to test your app with different screen resolutions, font sizes, accessible talk back, high contrast, dark mode and even in desktop mode.
- Backwards Compatibility: Although this can be implicit in the first point, it is important that besides testing across devices and customisation options you test older versions of Android as well.
- Play Store Restrictions & Guidelines: Google’s Play Store constantly changes their rules and guidelines for app submission which you need to comply otherwise you might not be able to submit your app.
What does a good Android Developer look like?
- Error Handling: A good Android developer handles gracefully any type of errors that might happen during the user experience, and it is able to communicate effectively to the user and log them to a remote system for error monitoring.
- Restore after process death: The Android OS commonly kills apps that are not being used, but, when the app gets re-executed, it tries to restore the state, but it does not restores any in-memory class/value.
- Honor user’s preferences: A good Android developer handles Device configuration changes, like screen rotation, dark/light mode changes, app resize, language change and back button behaviour.
- UI/UX Guidelines: A good Android developer knows the Platform’s guidelines for User Interface, Material Design in Android’s case, and is aware of the behaviours and components that the user expects to interact with.
- Responsive Design: Unlike iOS Development and more like Web Development, Android devices tend to be very different one from another and come in different form factors, from phones to tablets and XR applications, your app should adapt to all of them using Responsive Design
- Lifecycle Management: A good Android developer understands the lifecycle of components and handles scenarios to prevent memory leaks trough the app and uses tools to prevent and verify performance of the app.
- Permissions: He understands what permissions and when to show them to the user to access user information.
- Performance: A good Android developer understands that a Mobile platform is a constrain environment and uses tools and techniques that optimise performance and avoid unnecessary network calls and avoids memory leaks.
- Input Methods & Accessibility: Android offers a lot of ways to interact with the OS, like finger, stylus, mouse & keyboard.
Programming Languages
Android Fundamentals
Build Automation tools
Gradle
- Creating Gradle Project struct…
- Interacting with Gradle trough CLI
Interface & Navigation
App Launch
As we’ve seen, any Activity can be an entry point for your app, but, there are other ways to start a flow in your app.
- Launcher Icon
- Android Shortcuts
- Android Widgets
- Android Voice Assistants
- Android Deeplinks
- Android Notifications
Android Splash Screen
Android Icon - Adaptive Icon
- Material Design Guidelines
Interface Elements
- TextView
- EditText
- Buttons
- ImageView
- ListView
- Tabs
- Dialogs
- Toast
- Bottom Sheet
- Drawer
TopAppBar→ AppBarBottomAppBar→ ToolBar- Animations
Android UI Frameworks
- Android XML / Views (Android Views)
- Jetpack Compose
Navigation
- Back button & Stack
- Deeplinks
- App Shortcuts
Architecture and Patterns
Software Architecture Patterns
Separation of Concerns
Cient Architecture Patterns
- MVC
- MVI
- MVVM
- MVP
Architecture Patterns for Mobi…
Modeling ViewModel State in An…
Design Patterns
Dependency Injection
- Dagger
- Hilt
- Koin
Observer Pattern
- Flow
- LiveData
Serialization
Parcelable vs Serializable
- Serializable (Java)
- Reflection (worst performance)
- Easier to implement
- Multiplatform
- General-purpose serialization mechanism
-
Serializable (KotlinX Serialization)
- Parcelable
- Better performance (Good for performance-critical scenarios)
- Android-specific (Stores in bundle)
Specify how to use parcelable
Implement Parcelable interface, and specify a CREATOR
Parcelable
Asynchronism
Kotlin Coroutines
- Cancellation
- Lifecycle
- Catching errors
- Kotlin Flows
- Threads
Android Platform Architecture
Knowledge about how the platform works under the hood
- Android Internals
- Android Platform Architecture
- Android Runtime
- ART Optimization profiles
- Android APIs
Linting & Formatting
- Detekt
- Ktlint
Version Control
- Git
- Branching Strategies for Mobile development
Debugging
Debugger
- Conditional breakpoints
App Inspector
- Network inspector
- Database Inspector
Logging
Network mocking
Security
Sandboxing Model
Device Rooting
- No store secrets on the client
Cryptography
- Android Keystore
- AES
Biometrics
Biometrics in Android
Most (but not all) modern android devices, have some kind of biometric reader, meaning that they provide a reliable way to prove that the user is the actual device’s owner.
Starting with biometrics
Dependencies
androidx.biometric:biometric:1.1.0Check Biometrics
val biometricManager = BiometricManager.from(context)
when (biometricManager.canAuthenticate(BIOMETRIC_STRONG or DEVICE_CREDENTIAL)) {
    BiometricManager.BIOMETRIC_SUCCESS -> // Can authenticate
    BiometricManager.BIOMETRIC_ERROR_NO_HARDWARE -> // No biometric hardware
    BiometricManager.BIOMETRIC_ERROR_HW_UNAVAILABLE -> // Hardware unavailable
    BiometricManager.BIOMETRIC_ERROR_NONE_ENROLLED -> // No biometrics enrolled
}
Create biometrics prompt
val promptInfo = BiometricPrompt.PromptInfo.Builder()
    .setTitle("Biometric login for MyApp")
    .setSubtitle("Log in using your biometric credential")
    .setAllowedAuthenticators(BIOMETRIC_STRONG or DEVICE_CREDENTIAL)
    .build()
Handle Authentication result
val biometricPrompt = BiometricPrompt(this, executor, object : BiometricPrompt.AuthenticationCallback() {
    override fun onAuthenticationSucceeded(result: BiometricPrompt.AuthenticationResult) {
        // Proceed with authenticated action
    }
    override fun onAuthenticationFailed() {
        // Handle failed authentication
    }
    override fun onAuthenticationError(errorCode: Int, errString: CharSequence) {
        // Handle error
    }
})
Trigger the prompt
biometricPrompt.authenticate(promptInfo)
Use cases
- Log-in
- Display sensitive information
- Encryption
Permission Model
We can create a custom permission that other apps have to comply with, in order to maybe access to IPC connections.
- Define permission
<permission android:name="…">- Protection levels
normal= Don’t require user confirmation. (i.e. Internet)dangerous= Require user’s permissions (i.e. Audio record) - show permission dialog requesting permission.signatureRestrict permission to apps that are signed with the same keystore in order to access it.
- Protection levels
- Use permission
<uses-permission android:name=".." >
Android App Hacking & Reverse Engineering
Key take aways:
- Secrets don’t belong to the app bundle
- Move to the backend and implement rules
- Restrict keys usage i.e. using app signature
- Change app’s source code (i.e. remove ads, free premium features)
- Advanced code obfuscation i.e. DexGuard
Performance Management
- Heap & Garbage Collection
- Memory Leaks
Battery Management
Battery drain
- Wireless connections (specially if signal is poor)
- CPU-Intensive processes
- Location tracking
Doze Mode & App Standby
- Maintinance window
Benchmarking
Profiling
Networking
- Ktor
- Retrofit
- OkHttp
Data and Files Persistence
Databases
- Android Room
- SQLDelight
- Realm
Key-Value
Datastore
Data store is a **replacement **to Android’s Shared Preferences, it is also available as a KMP library.
There are two versions of the DataStore:
- Regular Data Store: Regular string-based store
- Proto Data Store: Type-safe store
Setting up data store in KMP
- Add Dependencies
// common main
expect fun createDataStore() : DataStore<Preferences>

internal const val DATA_STORE_FILE = "prefs.preferences_pb"
// android main

actual fun createDataStore(context: Context) : DataStore<Preferences> {
	return createDataStore {
		context.filesDir.resolve(DATA_STORE_FILE).absolutePath
	}
}

// ios Main
fun createDataStore(): DataStore<Preferences> {

return createDataStore {
 val directory =
 NSFileManager.defaultManager.URLForDirectory (

	directory = NSDocumentDirectory,
	inDomain = NSUserDomainMask,
	appropriateForURL = null,
	create = false,
	error = null
 )
requireNotNull (directory) .path + "/SDATA_STORE_FILE_NAME"
 }
}- Shared Preferences
- EncryptedSharedPreferences
File Storage
- Internal & External Storage
- FileSystem
- External Storage (SD Cards, etc)
- Cache Storage
Background Work
Foreground Services
Platform Integration
Credential Manager
Credential Manager vs Account Manager:
Account manager is now Deprecated and Credential manager is the preferred way to store user’s information.
On-device AI
In-App AI Models
GenAIMLKit- high-level interface for specific features: summarisation,proofreading, rewrite image descriptionMediaPipe- Multiple AI models, i.e. face recognition, hand tracking, etc.VertexAI- Cloud ModelsGemini Nano(Experimental) - Only Pixel 9 & Opt-in - Docs
AICore - System service isolated with
File access
Camera
Maps
Google Maps
Mapbox
Open Maps
GPS
- Health
Widgets
Google Wallet / Google Pay
Accessibility
Why
EU Enforcements
Types of disabilities
Tools
- Talkback
- Contrast
- Font size
- Touch Area (Minimum 48x48)
- Labels & Content description
Developing for Accessibility
XML
Screen Readers: Content Description
android:contentDescription="A button that performs a specific action" />
Screen Readers: Extra context for clickable elements
By default the action for clickable elements says Double tap to activate but if you want your accessibility to say something like Double tap to open link you can do by adding a custom AccessibilityDelegate and overriding the NodeInfo
        ViewCompat.setAccessibilityDelegate(binding., new AccessibilityDelegateCompat() {
            @Override
            public void onInitializeAccessibilityNodeInfo(View host, AccessibilityNodeInfoCompat info) {
                super.onInitializeAccessibilityNodeInfo(host, info);
                info.addAction(
                    new AccessibilityNodeInfoCompat.AccessibilityActionCompat(AccessibilityNodeInfoCompat.ACTION_CLICK, "open link")
                );
            }
        });
Focus & Navigation
Arranging elements in a logical and sensible way is crucial for people with disabilities, for this usually android by default reads content from top-left and left-to-right.
But if you need greater control of the order in which things are displayed, you can do so by using:
**android:accessibilityTraversalAfter**and**android:accessibilityTraversalBefore**in XML**setAccessibilityTraversalBefore**and**setAccessibilityTraversalAfter**in code
Internationalisation
- XML Files
- Remote config
- Tolgee
Analytics
What and why
How
- Allow to inject everywhere
- ViewModel
- UI (Compose/Fragment)
- Central place
- Testing & Visualisation
Build Process
Gradle
- Plugins
- Dependencies
- Modules
- Build Variants
Proguard & R8
- Shrink Resources
- Obfuscation
- Optimisation
- Modularisation
- Module CachingA
Testing
Unit Testing
Fast execution
- Isolated from the android SDK
- Executed in JVM
- Frameworks:
- JUnit
- Mockito / Mockk
Integration Testing
End-to-End Testing
Manual Testing
- Espresso Framework
- Jetpack Compose Testging
CLI Tools
Dev Environment setup
How to setup PATH and JAVA\_PATH
- Android SDK Build tool
- Android Emulator
- Android SDK Platform-tools
- Android SDK Tools
ADB
Install APK
adb install path/to/your_app.apk
Bundle Tool
Keytool
Distribution
Distribution formats APK vs AAB
Android Application Package (APK)
Is a** ZIP file** containing all the app’s compiled DEX files & resources, along with a merged Manifest.
Making it ideal for simple distribution, since it is a single file that allows your app to run on all Android devices.
Android App Bundles (AAB)
Is a flexible format that can’t be directly installed on a device, and it is specifically meant to be uploaded to the Google Play Console that then, **will generate an Optimised APK **based on each user’s device, removing resources that might be needed only for different screen densities, etc.
They also allow for on-demand app features that can be dynamically loaded on runtime.
App Signing
App signing is a security mechanism imposed by the Android OS and Google Play. It allows to identify the author of the app, this is to prevent people that might have access to your Play Console account from publishing or updating an app on your behalf and spread malware.
To install an APK on a device it has to be signed, even when we run manually, under the hood, Android Studio has a debug keystore.
Every app in the Play Store has to be signed. Once you publish your app, every update has to be signed with the same key.
- Private key: Only private key can generate a successful signature for the public key
- Public key: baked into file
- Certificate: Identify you as the owner (name, address, country)
- Keystore: Stores multiple public/private keys and it is used to sign an app.
- File format is (
.jks/.keystore) - STORE THIS KEY!
- Needs a password (different to the private key password)
- File format is (
Managing Keystore files
- Ideal: Ideally, you should have the keystore outside of the git repository and sync it externally. Additionally, they password should be readed from a
gradle.propertiesfile that is excluded from git. - Meh: Store the keystore in the git repository, but keep the password outside of it and just read it from a
gadle.propertiesfile excluded by git. - Bad: Store the keystore and the password on the same git repository.
Creating a Keystore and signing an app
- Build → Generate Signed Build
- Create Keystore file and set password
- Create key (and alias) and set password
Update your build.gradle so that build variants get signed accordingly
signingConfigs {
 create("release") {
   storeFile = file("../signing/release.jks")
   keyAlias="app-release"
   keyPassword="password0"
   storePassword="password0"
 }
}

buildTypes {
release {
signingConfig = signingConfigs.getByName("release")
}
}
Google Playstore Console
App Distribution checklist
- Minify or shrink
- Analytics & Crashlytics
- Test with different devices
- Playstore Listing Optimisation
- Images
- Icon
- Keywords
- Description
Google Play app signing (AAB Only)
- Upload private key
Monetisation
- Revenue Cat
- Playstore SDK
Library Distribution
Distribution Formats
An android project can use** both** JAR and AAR, formats, while JVM projects will only be able to use JAR files.
JAR (Java Archive)
These files are generic JVM library formats containing only compiled Java classes.
AAR (Android Archives)
Is a file format specifically for Android development, which besides regular source code, can include Android resources, such as layouts, drawables and manifests.
Distribution platforms / Package Repository
Jitpack
What is Jitpack?
Jitpack is a modern package repository for JVM applications, it directly builds github repositories on-demand, supporting releases, snapshots and even commit-based builds.
Configure your project
Android single variant
In your library’s build.gradle, you can add the following code:
plugins {
    //id("com.android.library")
    //id("org.jetbrains.kotlin.android")
    //id("org.jetbrains.kotlin.plugin.compose")
    alias(libs.plugins.maven.publish)
}

publishing {
    publications {
        register<MavenPublication>("release") {
            groupId = "com.<yourGroupId>"
            artifactId = "<module>"
            version = "<Version>"

            afterEvaluate {
                from(components["release"])
            }
        }
    }
}
android {
	    publishing {
        singleVariant("release") {
            withSourcesJar()
            withJavadocJar()
        }
    }
}
Check your project's builds
You can search your project by using its repository name and you will be able to see its versions and builds.
Debug menu example - [Tapadoo] Debug Menu
MavenCentral
MavenCentral is the most well-known package repository, it supports regular JVM packages as well as Kotlin Multiplatform libraries.
- Github Maven
Multiplatform
Other Platforms
AR/VR
Jetpack SceneCore
SurfaceEntity - Render Video
- Render 360 VR Video
- Render 180 VR Video
3D Elements
SceneViewer - Display 3D Elements
- GLB File: Binary transmission file for GLTF
Hand gestures
ARCore - Understand environment
Cross-Platform
- Compose Multiplatfrom
- Kotlin Multiplatform
- Multi-Module Architecture
Wearables
Tablet
Desktop
Common Flows
One of the most common flows for Android development with guides and best practices.
UI
Text Input
Text Input in compose
Password Input (compose v1.8.0)
Password Field
You can use the SecureField , which hides the password by default and disables copy and paste actions.
To toggle Field visibility, you can use the textObfuscationMode parameter from the SecureField , which will take either Visible Hidden or RevealLastTyped
Auto fill
Any Input can now have a semantics and ContentType which will either suggest and autofill them, or once we commit to the AutofillManager, the system will prompt the user to update the content.
val autoFillManager = LocalAutofillManager.current

OutlinedTextField(
 //...
  Modifier.semantics { contentType =ContentType
 },
  textObfuscationMode = if(isPasswordVisible) Visible else RevealLastTyped
)

Button({autofillManager?.commit())}) {
  Text("Sign Up")
}
OTP Input
An OTP would have 6 fields, each one should allow only 1 digit, move focus when switch, concatinating at the end and support for auto fill.
All of this work seems like a lot, so a better approach would be to use the BasicTextField composable that doesn’t come with any styling by default.
BasicTextField(
	state = text,
	decorator = { index
		repeat(6) {
         DigitInput(text.getOrElse(index,""))
		}
	},
	modifier = Modifier.semantics {
		contentType = ContentType.SmsOtpCode
	}
)
Chat Input - Rich Content
In some apps, like a chat, the text input is not only text, but also Image support, Gifs, Image drag and drop and pasting from clipboard.
The contentReceiver modifier can be applied as a parent of the TextField and not only there. This makes so that the whole UI is able to receive DnD and not only the textInput
TextField(
	modifier = Modifier.contentReceiver { transferableContent ->
		// handle URLs (for Gifs)

	}
)
Text Transformation
The new textField APIs allow you to transform the input and the output (UI) of the TextField, following the diagram, in this example we want to format a Phone Number as the user types and filter any incorrect input. As the example below
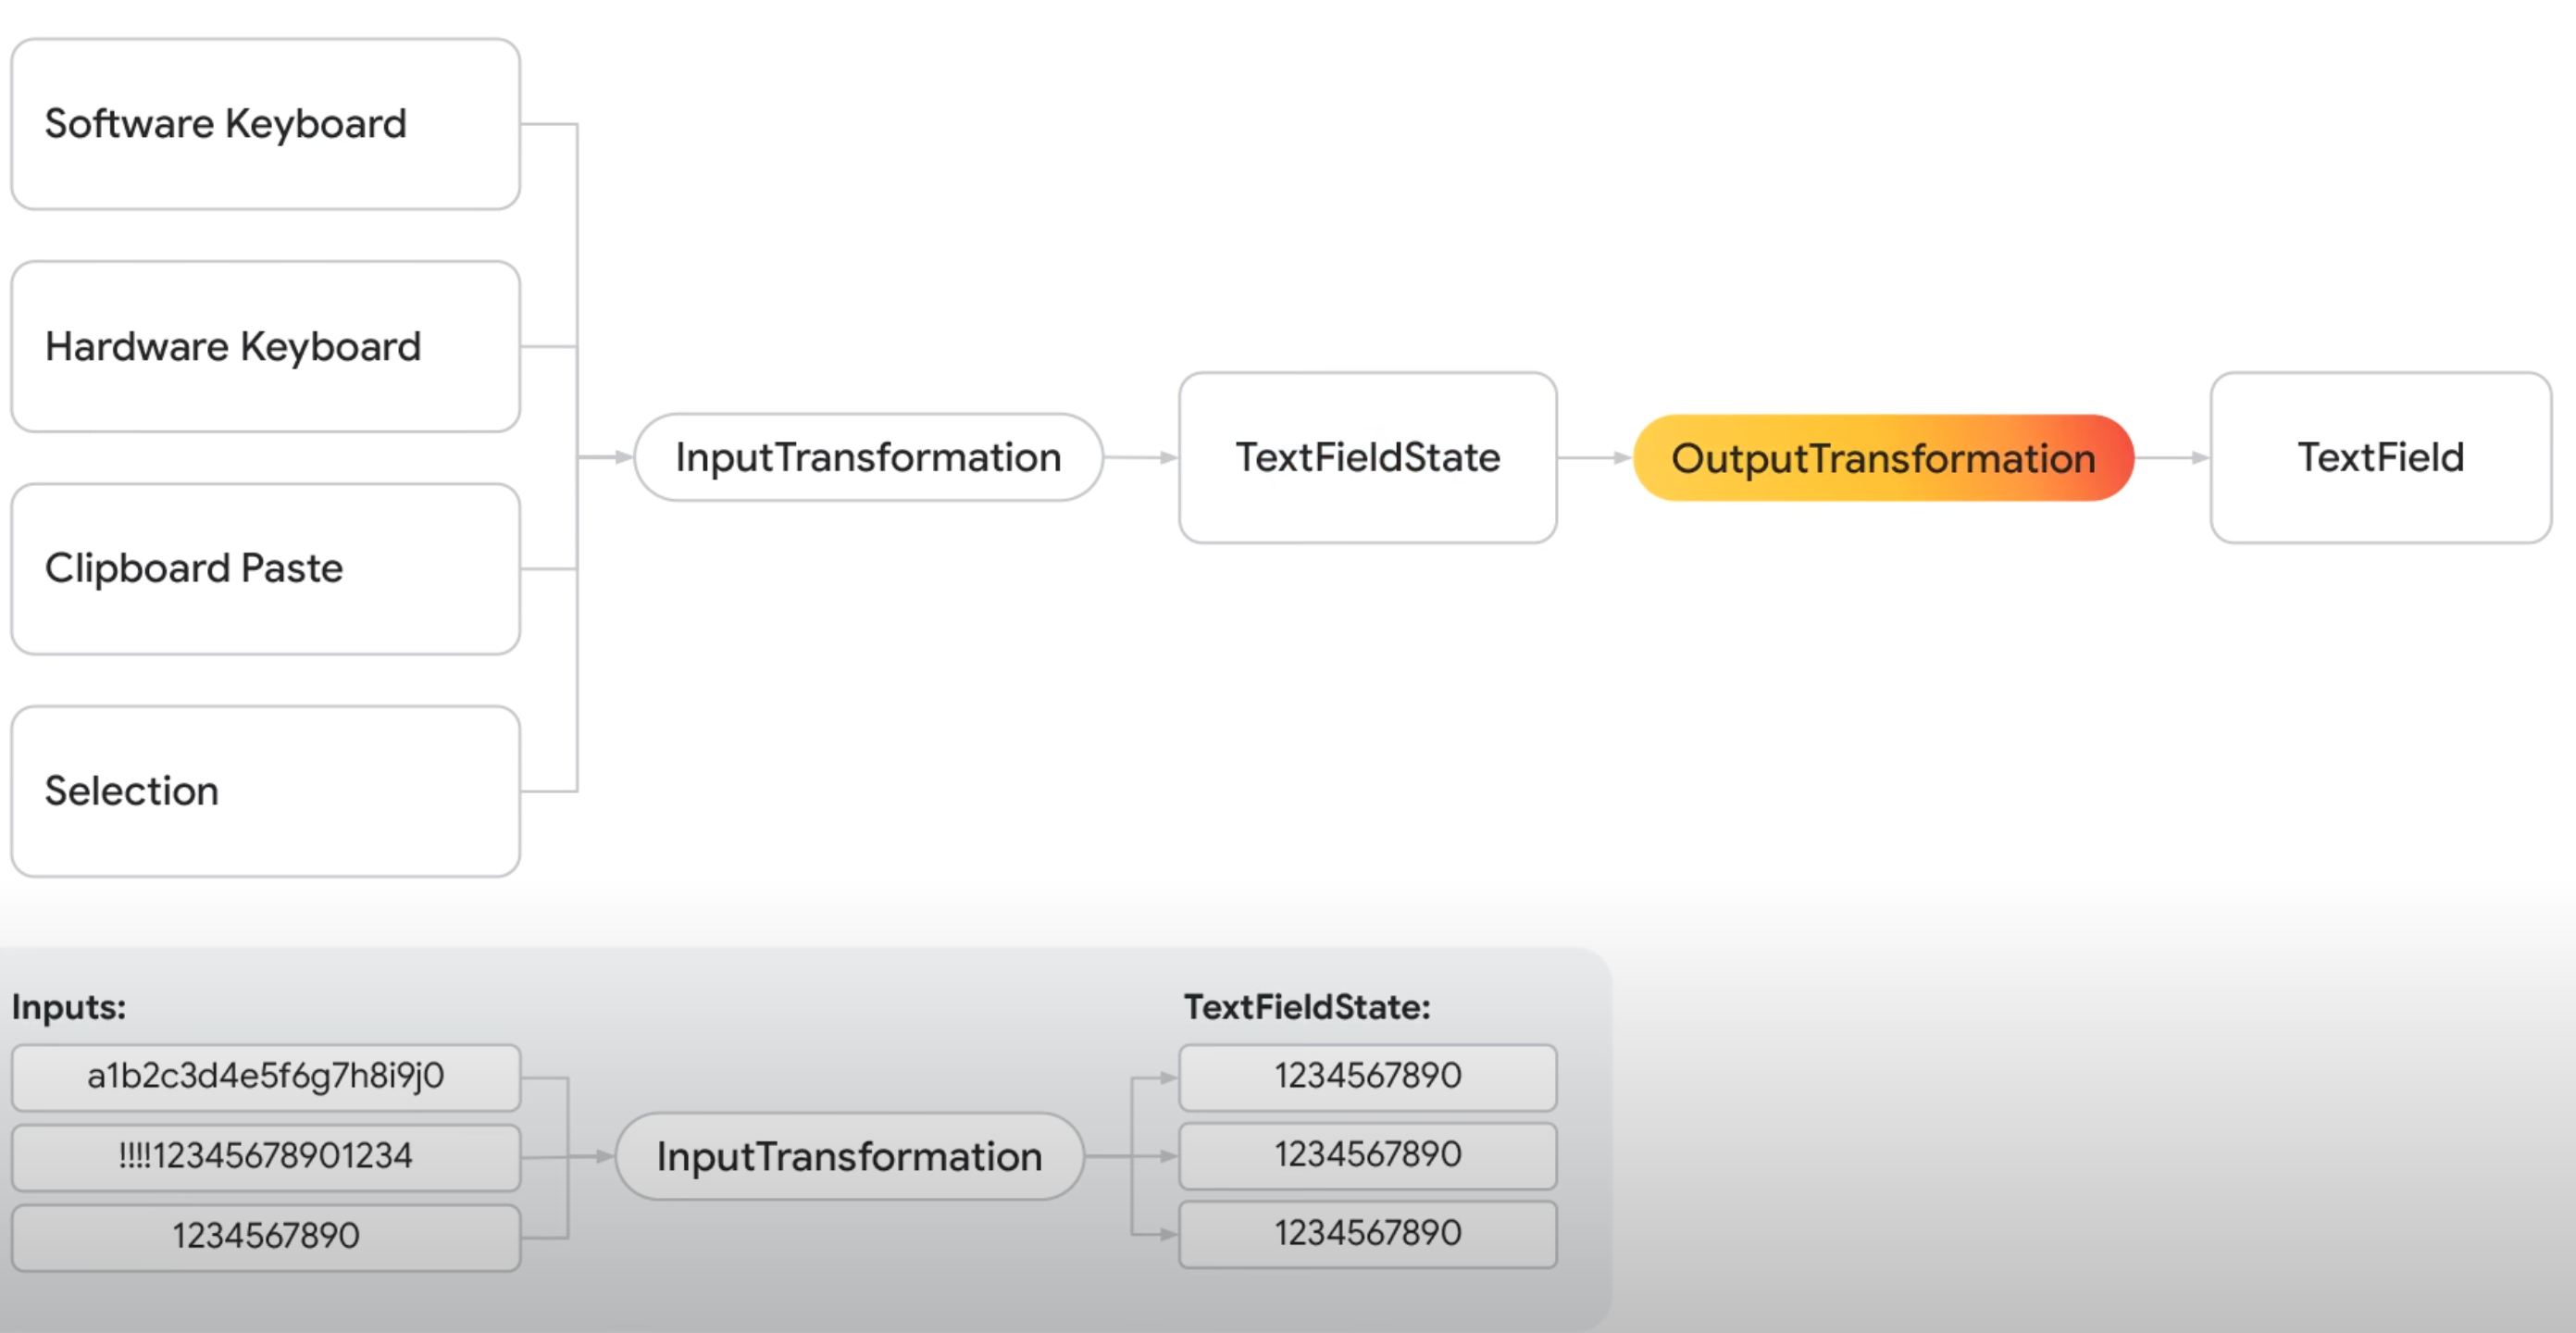
TextInput(
// Max 10 digits and only numbers
inputTransformation = InputTransformation.maxLength(10).then {
if(!TextUtils.isDigitsOnly(asCharSequence())) {
	revertAllChanges())
}
},
outputTransformation = PhoneNumberOutputTransformation()

)

class PhoneNumberOutputTransformation : OutputTransformation {
	override fun TextFieldBuffer.transformOutput() {
		if(lenght > 0) insert(0,"(")
		if(lenght > 4) insert(0,")")
		if(lenght > 8) insert(0,"-")
	}
}
Navigation in Compose (viewModel navigation & override start)
This method allows us to override the startDestination when performing e2e testing and perform navigation from the ViewModel
import androidx.navigation.NavOptionsBuilder
import kotlinx.coroutines.channels.Channel
import kotlinx.coroutines.flow.Flow
import kotlinx.coroutines.flow.receiveAsFlow

interface Navigator {
    val startDestination: Destination
    val navigationActions: Flow<NavigationAction>

    suspend fun navigate(
        destination: Destination,
        navOptions: NavOptionsBuilder.() -> Unit = {}
    )

    suspend fun navigateUp()
}

sealed interface NavigationAction {

    data class Navigate(
        val destination: Destination,
        val navOptions: NavOptionsBuilder.() -> Unit = {}
    ): NavigationAction

    data object NavigateUp: NavigationAction
}

sealed interface Destination {
    @Serializable
    data object HomeGraph: Destination

    @Serializable
    data object AuthGraph: Destination

    @Serializable
    data object LoginScreen: Destination

    @Serializable
    data object HomeScreen: Destination

    @Serializable
    data class DetailScreen(val id: String): Destination
}

class DefaultNavigator(
    override val startDestination: Destination
): Navigator {
    private val _navigationActions = Channel<NavigationAction>()
    override val navigationActions = _navigationActions.receiveAsFlow()

    override suspend fun navigate(
        destination: Destination,
        navOptions: NavOptionsBuilder.() -> Unit
    ) {
        _navigationActions.send(NavigationAction.Navigate(
            destination = destination,
            navOptions = navOptions
        ))
    }

    override suspend fun navigateUp() {
        _navigationActions.send(NavigationAction.NavigateUp)
    }
}

// Usage Example
  viewModelScope.launch {
            navigator.navigate(
                destination = Destination.DetailScreen(id),
            )
  }
Data
Adding Auth
Make sure to use AccountManager/CredentialManager
Token-based Auth
Setup
Setup API Service & Endpoints
Login
Should return a token and refresh token
Other Authenticated calls
Log out
Create a TokenStorage that will save and retrieve the tokens.
The token storage should allow to get, update and delete the tokens.
The actual storage can be saved in:
EncryptedSharedPreferencesSharedPreferences
How to encrypt token and BiometricUsage
Implement a TokenRefreshAuthenticator
It should pull the refresh token from the TokenStorage
Create an Authenticator Interceptor
This authenticates all the requests with the **stored token **and when received an Unauthorised response, it refreshes the token using the TokenRefreshAuthenticator
How can I inject my tokenStorage and authenticator refresh in my HTTP Client??
Dependencies
- HttpClient
- Interceptor
→TokenStorage
→RefreshAuthenticator
- Interceptor
- TokenStorage
- Token RefreshAuthenticator
→HttpClient
Flow
- User Logs In,
TokenStoragesaves the token - The
AuthenticatorInterceptorautomatically adds the token to all requests - User can Interact with the app as normal
- When token is about to expire, the
TokenRefreshAuthenticatorrefreshes the token, if successful, theAuthenticatorInterceptorshould automatically use the new token, if not the user has to be logged out. - To log out the user, you have to…?
Activity Provider
Some SDKs, like Android Biometrics require a reference to the activity, in order to work, the problem with this abstraction is that biometrics are usually used in the Data layer and throughout the app, having to handle and passing the Activity reference from multiple places and trough different layers is a leaky abstraction.
// Provided as @ActivityScoped via Hilt
class ActivityProvider : DefaultLifecycleObserver {
    private var ref: WeakReference<FragmentActivity>? = null

    fun bind(activity: FragmentActivity) {
        ref = WeakReference(activity)
        activity.lifecycle.addObserver(this)
    }

    fun get(): FragmentActivity? = ref?.get()

    override fun onDestroy(owner: LifecycleOwner) { ref = null }
}

// Activity binds itself — no reference passed anywhere
class LoginActivity : FragmentActivity() {
    @Inject lateinit var activityProvider: ActivityProvider

    override fun onCreate(...) {
        activityProvider.bind(this) // ✅ self-registers
    }
}
Encrypting Data Store
Skill Progression
| Skill Level | Knowledge |
|---|---|
| Novice | - Basic Kotlin/Java syntax - Simple UI creation - Understanding of Android app structure |
| Developing | - Proficiency in Kotlin/Java - Working with Android Jetpack components - Basic networking and data persistence |
| Proficient | - Advanced language features (coroutines, RxJava) - Custom UI components - Integration of third-party libraries |
| Advanced | - Complex app architectures (Clean Architecture, MVVM) - Performance optimization - Advanced Android frameworks (WorkManager, Navigation) |
| Mastery | - Contributing to open-source Android projects - Creating reusable libraries/SDKs - Mentoring other developers - Staying updated with latest Android technologies |
References
GitHub - skydoves/android-developer-roadmap: 🗺 The Android Developer Roadmap offers comprehensive learning paths to help you understand Android ecosystems.
How to organise Gradle Apps and modules
Interview Preparation
Round 1: Data Structure & Android Basics
- Data Structures, Algorithms and Android Basics
Questions
Time complexities for common algorithms
Difference between HashMap and ConcurrentHashMap
Android Lifecycle Methods
Thread-safe singleton pattern
Garbage collection in JVM
Coding Problems
Complexity
Valid Parenthesis with Stars
Problem:
Given a string with '(', ')', and '\*', check if it’s valid.
\*can act as'(',')', or be ignored.
Example:
Input: "(*))"
Output: true
Round 2: Core DSA Live Coding
Questions
Implement a LRU cache
Round 3: Android Fundamentals
Questions
Activity Lifecycle
Difference between Service , IntentService and WorkManager
How to avoid memory leaks with static references
What is LiveData and how does it manage observers
How to handle offline-first architecture.
Round 4: Low-Level-Design (LLD)
Questions
Design a Ride Booking Flow
Round 5: High-Level-Design (HLD)
Questions
Design Push Notification System
- Push Service
- User-Device Mappping
- Kafka for Queuing
- Retry logic
- Personalization
Walmart Inverview Experience
Cracking Senior Android Developer Interviews